Making a Paddle Keep
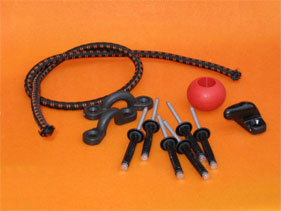
Seeing that the Prowler 13 has a built in paddle keeper, thought it would make a nice addition to the Caper. All that is required is 50 mm of 5 mm elasticated rope, 6 marine grade rivets, 2 x plastic eyes, 1 x plastic hook and a plastic rope ball.
On either side of the Caper, running the full length is a bevelled recess which the paddle and paddle keeper fit perfectly.
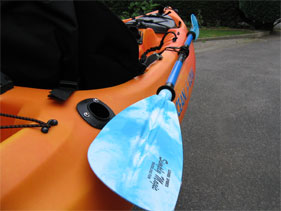
Sit in the cockpit and find a position where it is comfortable for you to fix and remove the paddle easily, personally I always lay the paddle down to the right hand side of the yak, the centre of the paddle being between the carry handle and the start of the footwell.
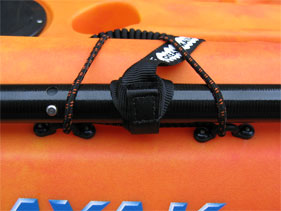
Holding the paddle in position, place the two rivets a minimum of 50mm apart directly below the paddle with the shaft sitting on the rivets, mark the holes. Drill holes using a 3/16" drill bit, clean up the holes and add a little silicone to each. Rivet the plastic eyes into position.
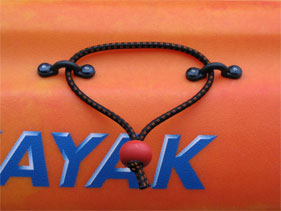
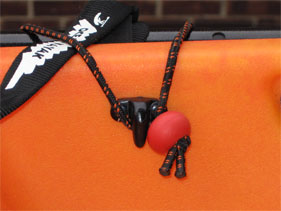
Thread the elastic rope down through each of the eyes so that the ends are hanging down, thread the rope ball onto the rope. It may be easier to stretch the rope making it thinner when doing this.
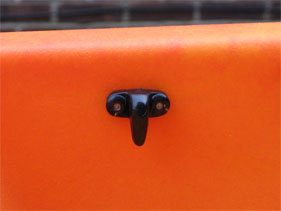
The holes on the plastic hook may need to be drilled out to except the rivets, on this version it was also necessary to file down one side of each rivet head to give a good fit.
Position the hook in the cockpit 25 mm down from the gunnel and centred between the rivets. Mark the holes and drill add a small amount of silicone to the holes before riveting.
Place the paddle in position, pull elastic over giving a tight be easily unhooked fit, then tie the ends using a thumb knot. Push as much of the knot as possible into the ball recess. A blunt ended screw driver can be used to push the knot into the hole.
Trim elastic ends and melt ends to stop any fraying.
This system works well and could be used to fix tackle boxes or a VHF radio to the centre console.
Disclaimer:
Installing hardware may cause damage and/or void manufacturer warranties. The information we provide is a free reference guide only. The author of this information, sponsors and the owners of the website that host this information are not liable for any problems or issues that arise from the use of this information. Users of this information hereby acknowledge that all use of this information is done by their own free will, at their own sole risk, understanding that injury or death could occur.