Installing a Flush Rod Holder
Flush rod holders are a cheap and versatile device for holding rods and landing nets when trolling or paddling out to your mark. They are available at most chandlers or as in this case purchased on ebay. I bought the three hole variety as I knew that these were made of a flexible plastic, if you have the hard plastic variety don't try and mould them as in the first part of this project.
If you are lucky enough to have a 9cm x 10cm flat area on top sides of your hull then fitting is not that difficult. If you have a Caper life is not so easy.
Most of the information I have read about the Caper has stated that it is not possible to fit flush mounts, well I like a challenge!
Part 1
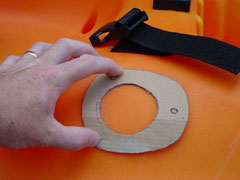
Make a cardboard template by cutting a hole to accommodate the tube and then draw around the head section of the mount, use this to choose the flatest spot in the chosen area. Draw around the template and mark the position of the hole where the tube will go through the hull, make sure that when the flush mount is fixed the tube is clear of obstructions and there is plenty of depth to accommodate the maximum length of tube.
Using the template, mark out the same shape onto an off-cut of suitable wood. Cut the hole to accommodate the tube and drill the holes to bolt the mount onto the wood. A profile gauge is now used to transfer the curve of your chosen deckspace onto the wood.
Either with a belt sander or by hand remove all of the unwanted area from the mould, leaving you with a duplicate of the chosen mounting surface.
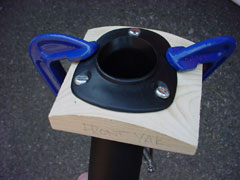
Bolt your flush mount onto the mould and clamp the sides to force the head to curve around the mould.
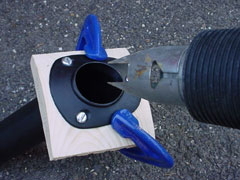
Using a hair dryer or a heat gun (very carefully), heat the head of the flush mount, concentrating around the top inside part of the tube. The tube, clamps and bolts will get incredibly hot so be careful, use strokes as if you were paint spraying to apply the heat so as not to melt the plastic.
Allow it to cool down with the clamps still attached.
If you have a kayak with plenty of flat areas then none of the above moulding process will be necessary.
Part 2
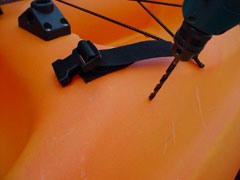
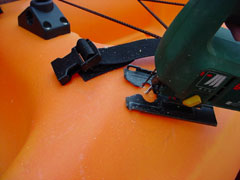
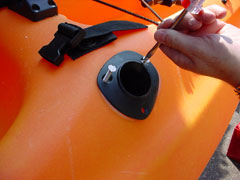
Drill a pilot hole for your jigsaw blade in the inner circle of the template drawn on your kayak. Then using a thin jigsaw blade proceed to cut the circle out, keeping to the inside of your line.
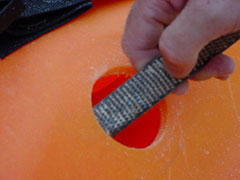
With a coarse round backed rasp and 80 grit sand paper shape the hole to accommodate the flush mounts tube, the hole will need to be angled at the front and back edges to fit the angle of the tube. Once the tube fits the hole it's worth putting a rod into the holder to check the angle of rest, you may want to alter the angle of the mount slightly to keep the rod higher. At this point you may also have to cut a section of tube off of the bottom to allow it to fit inside the hull, keep the tube as long as possible. Once happy with the angle and fit, drill pilot holes for the fixing screws.

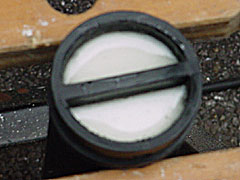
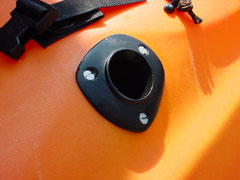
Regardless of whether you have had to remove some tube from the mount, the next job is to plug the hole at the base to stop any water entering the hull. You can do this with an Aerosol cap or any plastic lid that will fit over the tube snugly, glue in position with epoxy, or cut out a circle from a sheet of plastic and shape to fit inside the tube, fix with epoxy at the base. The drill hole can then be filled with epoxy.
Leave to dry.

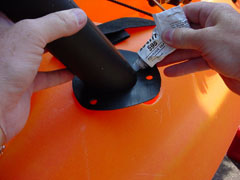
Cover the bottom surface of the flush fitting with Marine Sealant taking special care on the inside edge, I used Loctite 595 which drys translucent.
Position the holder and using marine grade self tapping screws fix the unit in place, allow the sealant to squeeze out around the head, smooth with a wet finger or round edged tool, check the sealant instructions first before getting it on your hands and avoid licking your fingers when smoothing off!
Leave sealant to dry for a couple of days before getting your kayak wet. If you are happy with the position of your first flush mount, it's time to fit another.
Remember that with this style of mount that you could easily loose any items in the event of a capsize or when trolling, make sure that your rods or nets are fixed to the kayak with a leash, Scotty manufacture several items that are suitable, or alternatively use a jet-ski key leash available at most chandlers.
Remove all items from flush mounts when launching and landing in surf, as a capsize could result in a holed hull, injury to yourself and others.
Disclaimer:
Installing hardware may cause damage and/or void manufacturer warranties. The information we provide is a free reference guide only. The author of this information, sponsors and the owners of the website that host this information are not liable for any problems or issues that arise from the use of this information. Users of this information hereby acknowledge that all use of this information is done by their own free will, at their own sole risk, understanding that injury or death could occur.